 Pin it
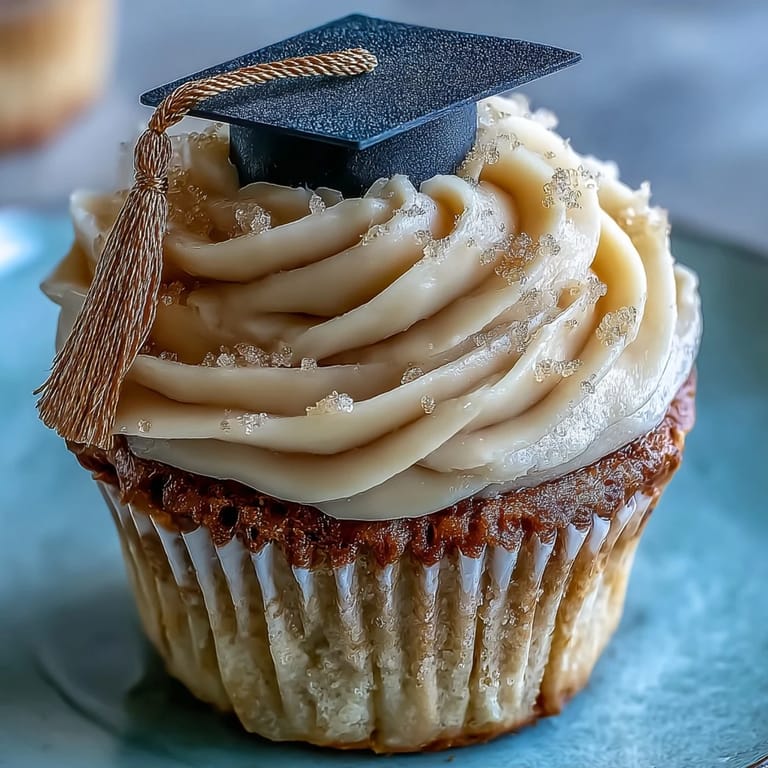
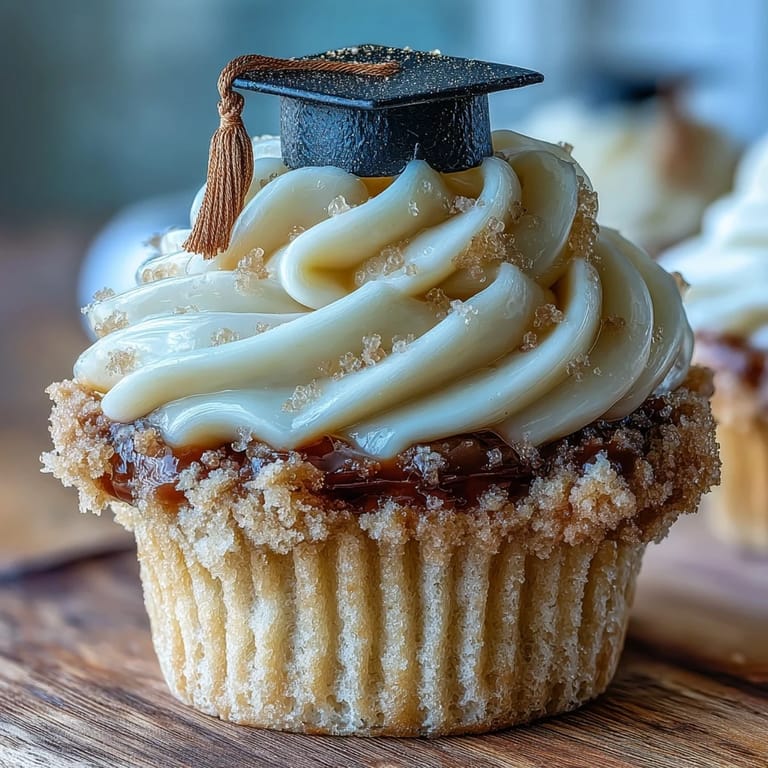
 Some recipes come with a built-in sense of occasion, and these Graduation Cupcakes with Black and Gold Fondant Caps are proof. The first time I baked these, my kitchen buzzed with the energy of celebration, as if even the mixer knew this was more than just dessert. There’s a curious joy in shaping tiny caps and tassels, hands slightly dusted with cornstarch, laughter echoing around the counter. Each swirl of buttercream and glint of gold edible dust makes the room feel festive, regardless of the weather outside. It’s a project that somehow manages to turn baking into a full-blown event.
Last June, these cupcakes became the centerpiece of our small backyard graduation for my cousin—half the family crowded onto the deck, trading stories and nibbling fondant pieces before the pictures even started. I remember my niece carefully pressing the gold tassels in place with sticky fingers and a grin, while we debated which batch of caps looked most ‘official.’ Even the dog lingered close, drawn in by the irresistible vanilla scent mingling with the warm afternoon air. By the end, we had more photos of cupcakes than of the grad. That’s when I knew this recipe was here to stay for every milestone.
Ingredients
- All-purpose flour: Go for the good stuff—I sift it for a lighter crumb, which means no dense cupcake disappointments.
- Baking powder: Essential for that perfect little dome on top, a trick I learned after some flat attempts.
- Salt: Just a pinch brightens the sweetness and keeps flavors balanced.
- Unsalted butter (for both cake and buttercream): Leave it out to soften, and your mixing arm will thank you later for easy creaming.
- Granulated sugar: Gives the cupcakes their classic sweetness and delicate crust.
- Large eggs: Add them one at a time; each one builds the batter’s smoothness.
- Vanilla extract: Trust me—real extract makes all the difference in both cake and frosting.
- Whole milk: I alternate pours with the dry mix for a tender, moist crumb every single time.
- Powdered sugar: Always sift for the silkiest buttercream, no lumps allowed.
- Pinch of salt (in frosting): It cuts the sweetness, just enough.
- Black fondant: Super pliable when warmed in hands, ideal for sculpting sharp cap corners.
- Gold fondant: Rolling ropes for tassels is pure craft-time fun, and leftovers make cheerful accent dots.
- Cornstarch (for rolling): Absolutely necessary to keep fondant from sticking—I used to skip it, huge mistake!
- Edible adhesive or water: Just a touch will hold everything tight, like edible glue.
- Edible gold dust (optional): Adds a twinkle—brush it on with a soft brush for a celebration-worthy finish.
Tired of Takeout? 🥡
Get 10 meals you can make faster than delivery arrives. Seriously.
One email. No spam. Unsubscribe anytime.
Instructions
- Prep your pans:
- Start by lining your muffin tin with shiny paper liners—the kind that holds up well once these beauties are frosted and topped.
- Mix dry ingredients:
- Whisk flour, baking powder, and salt in a big bowl, and soak in the floury scent that promises good things ahead.
- Cream butter and sugar:
- Use your mixer to whip butter and sugar until pale and fluffy—listen for the change in sound as it breathes in the air.
- Add eggs and vanilla:
- Drop in eggs one by one, then vanilla; let each swirl in until the batter looks golden and glossy.
- Combine wet and dry:
- Alternate adding flour mix and milk, stopping just when no streaks remain—don’t overmix if you want soft cupcakes.
- Bake and cool:
- Scoop evenly into liners and bake—your kitchen will smell like a vanilla cloud. Let cupcakes cool completely before decorating, or the buttercream will slide away.
- Make the buttercream:
- Beat butter, powdered sugar, milk, vanilla, and a tiny pinch of salt until smooth, thick, and irresistible, then pipe or spread onto cooled cupcakes.
- Shape fondant caps:
- Dust your counter with cornstarch, roll black fondant thin, and cut out those neat little squares for the top of each cap.
- Construct the caps:
- Roll balls of black fondant for cap bases, press gently to flatten, and stick each square to a base with a dab of edible adhesive.
- Finish with gold tassels:
- Roll gold fondant into ropes for tassels, secure one to each cap, and add a tiny gold ‘button’ for flair. Brush on gold dust for a hint of sparkle if feeling extra celebratory.
- Assemble and serve:
- Set each fondant cap atop its frosted cupcake, then stand back and admire your edible graduation parade.
 Pin it
 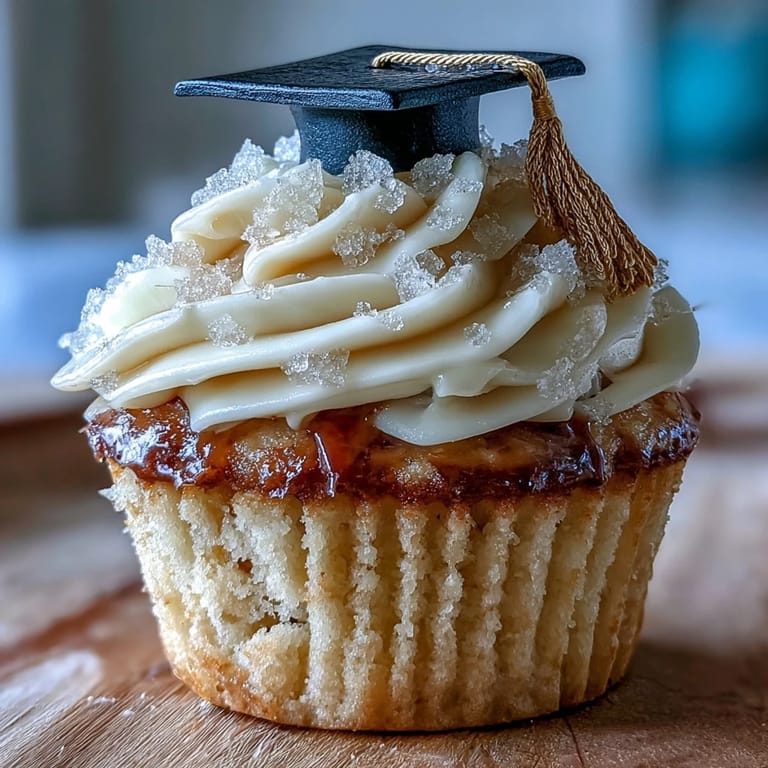 Pin it
 I’ll never forget the look on my cousin’s face when she recognized her school colors shimmering in edible gold atop each cupcake—suddenly, the celebration felt personal, like the sweets were cheering her on, too. It’s these little touches that turn a dessert into a memory.
Making Fondant Decorations Fun (and Easy)
I always thought fondant was for professionals until trying it myself while blasting my favorite playlist. Don’t fret if your caps aren’t perfectly square—quirky shapes end up looking even more charming lined up on the serving platter. If you’re decorating with kids, let them roll, shape, and place the tassels; the process is almost as joyful as eating the results. Smudged fingers and bursts of laughter are part of the tradition, and somehow those little imperfections bring out the biggest smiles.
Customizing for Your Celebration
Switching fondant colors to match school or party themes instantly personalizes each batch. Chocolate cupcakes work as a crowd-pleasing alternative if vanilla isn’t the graduate’s favorite flavor—just swap out the base, the buttercream and caps still work beautifully. You can even use edible markers to draw tiny initials or numbers on the caps for a custom touch without extra fuss. The true charm of these cupcakes is how easily they adapt to your occasion, making every celebration one of a kind.
Game Changers for Stress-Free Baking
Give yourself plenty of time and make the fondant caps a day ahead—they dry out just right and are sturdier for stacking on the buttercream. When it comes to piping, a big open star tip hides imperfect swirls under a crown of fondant, making you look like a pro. Clean as you go to keep the counters clear for rolling and shaping; bonus, no lingering sugar clouds by the end.
- Store completed cupcakes in an airtight container overnight if needed—nothing gets soggy.
- If you don’t want to mix gold fondant, yellow tinted with edible dust works just as well.
- Go easy on the edible adhesive—too much and the decorations get slippery.
 Pin it
  Pin it
 Baking these cupcakes always brings a dose of party spirit to my kitchen, and the smiles that follow make every step worthwhile. Here’s to sweet celebrations, big accomplishments, and desserts that steal the show every single time.
Recipe FAQs
- → How do I stop fondant from sticking while rolling?
Lightly dust your work surface and rolling pin with cornstarch. Roll gently and lift the fondant periodically to prevent adhesion; add a touch more cornstarch if needed, but avoid over-dusting to keep texture soft.
- → Can the cupcakes be made ahead of time?
Yes. Bake and cool the cupcakes, then store unfrosted in an airtight container for up to one day. Frost and top with fondant caps the day of serving for best texture and appearance.
- → What buttercream consistency is best for these tops?
Use a smooth, slightly stiff buttercream that holds shape when piped but still spreads easily. If too soft, chill briefly; if too firm, beat in a teaspoon of milk at a time until workable.
- → How do I give the gold elements a metallic shine?
Brush dry edible gold dust over the fondant using a soft brush. For a stronger metallic finish, mix gold dust with a few drops of clear edible alcohol or glycerin to create a paint, then apply sparingly.
- → Are there suitable substitutions for dietary needs?
For a vegan version, use plant-based milk and vegan butter, and choose a vegan-friendly fondant. Double-check fondant labels for traces of allergens if necessary.
- → How can I prevent cupcakes from sinking in the center?
Avoid overmixing the batter and fill liners about two-thirds full. Ensure accurate oven temperature and test with a toothpick at 18 minutes; remove once it comes out clean or with a few moist crumbs.